
Watercolor Sugar Cookies
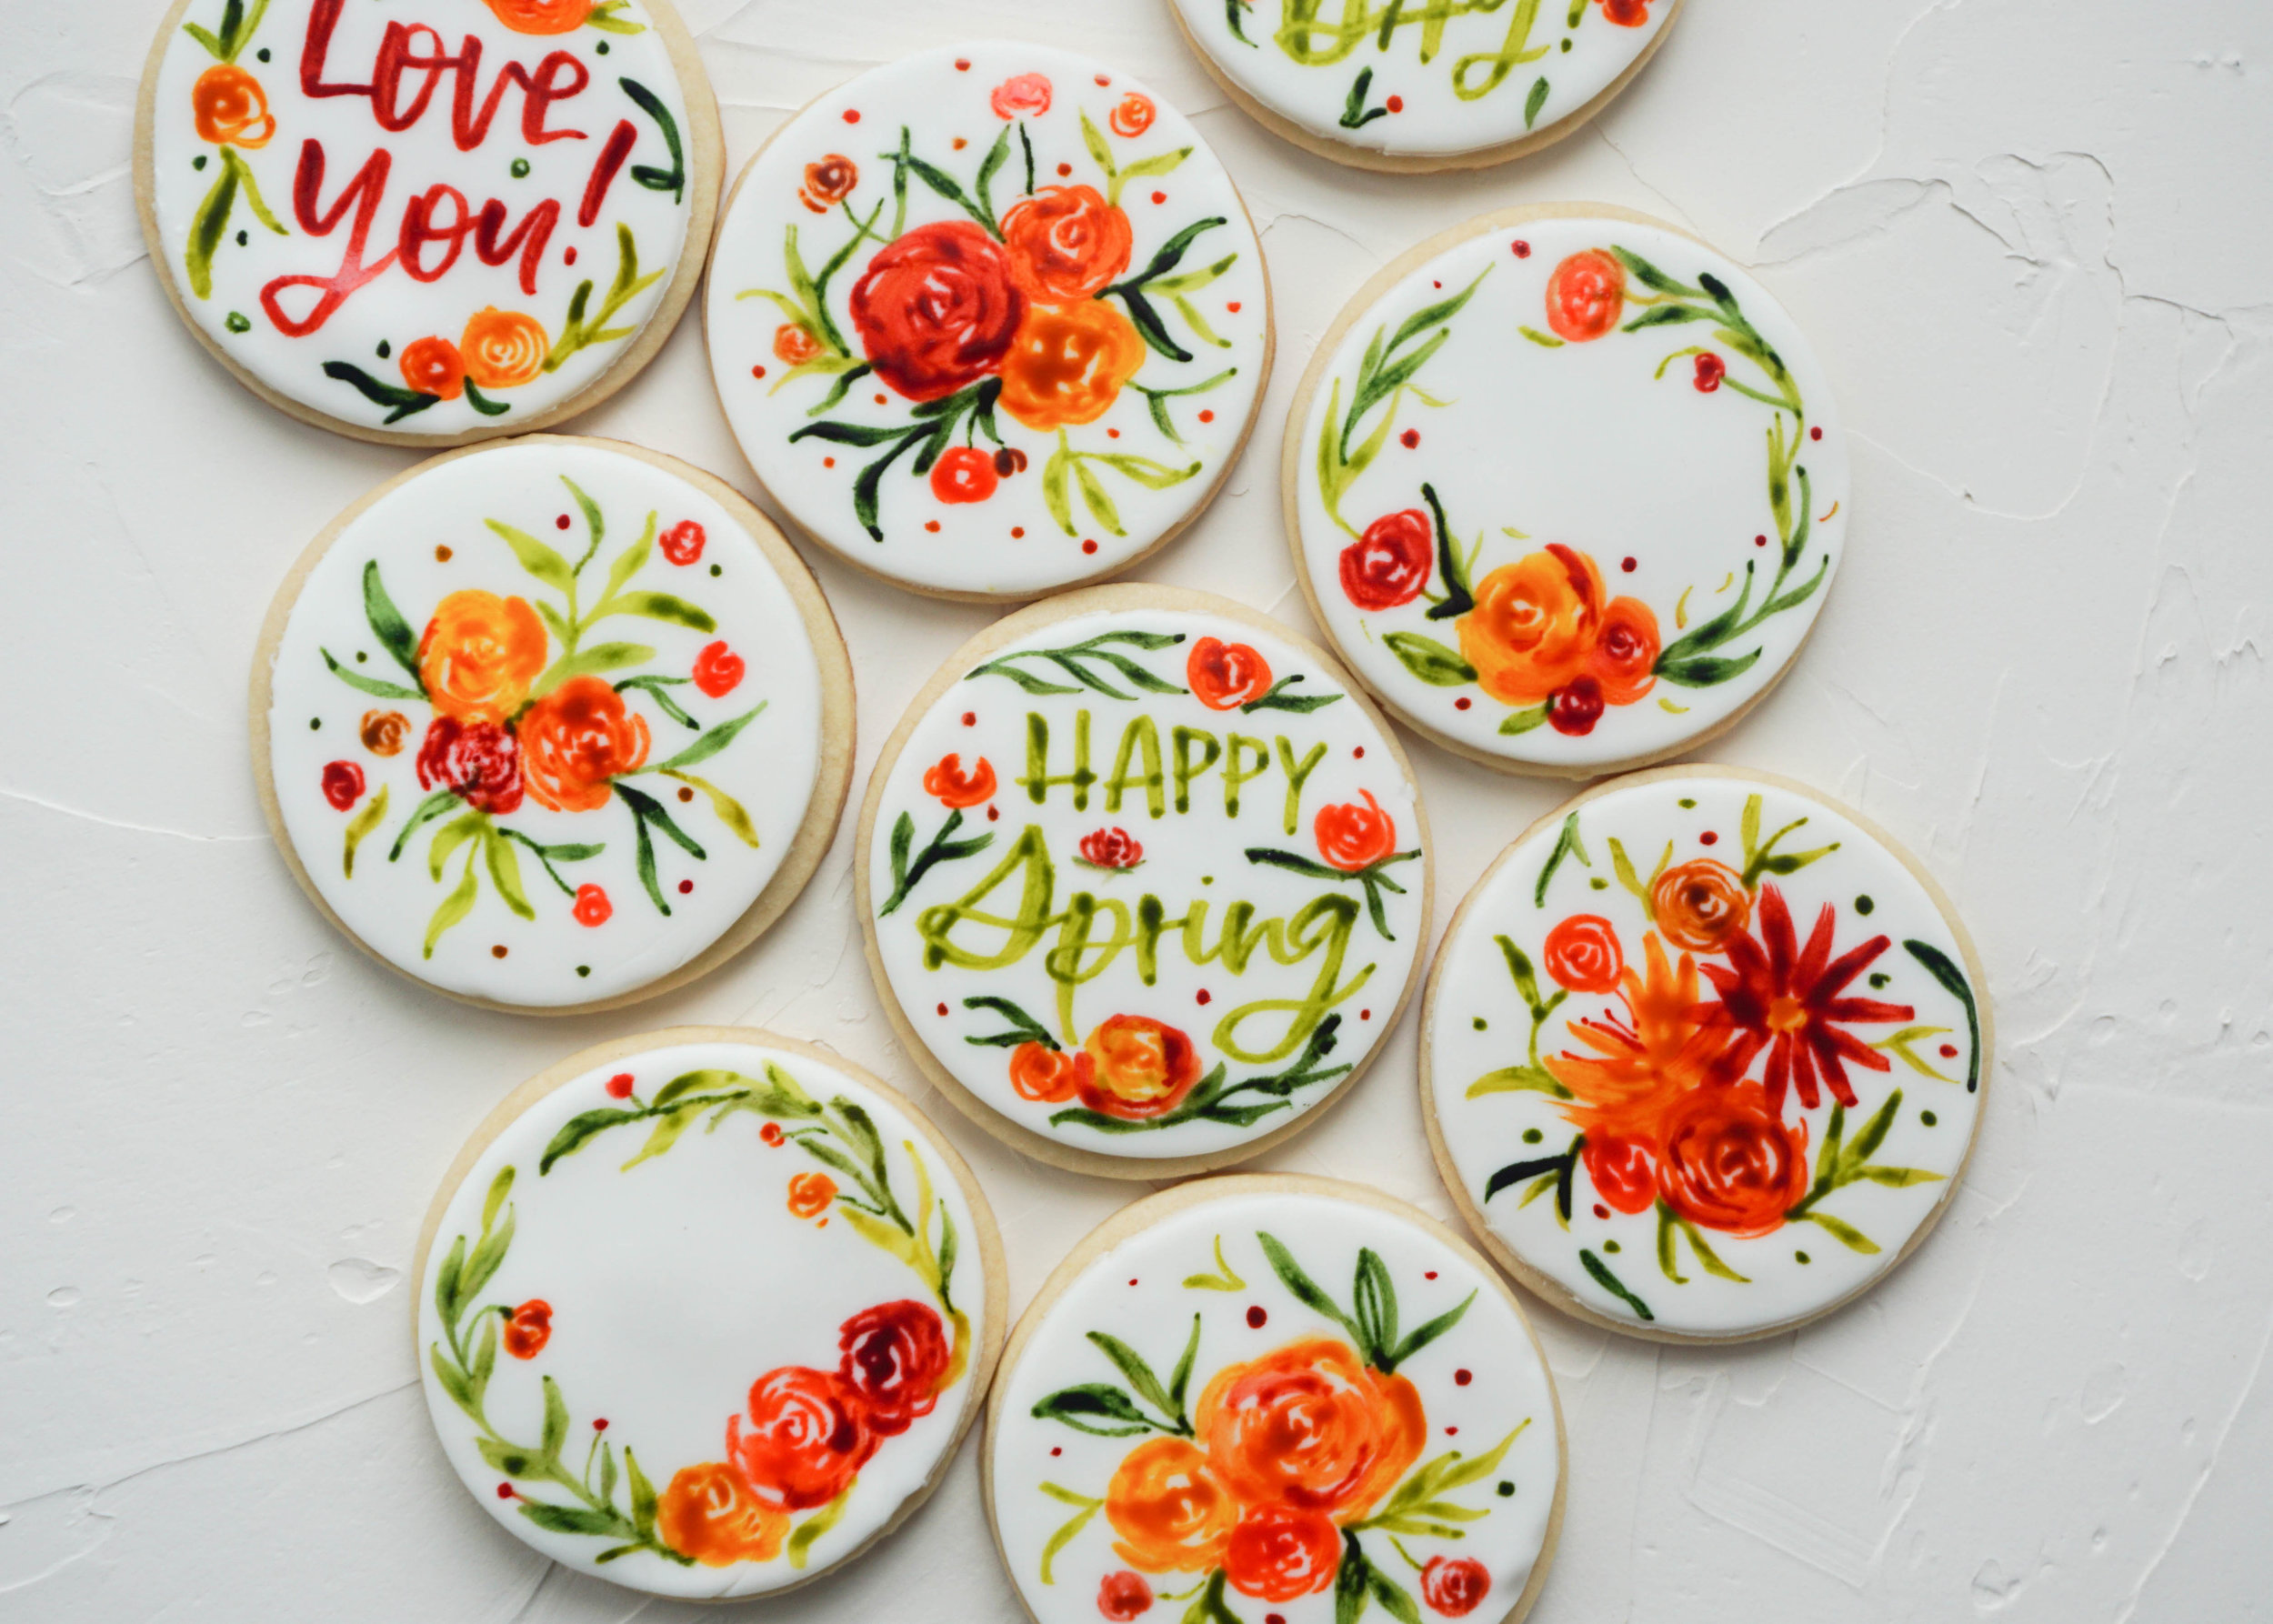


Happy Spring! Sorry if you are blanketed in snow still. It's rainy and gross in San Francisco right now, so not exactly sunshine and lovely budding trees. Since the weather is crappy outside, I'm going to make my own springy vibes by painting over the top cookies! Apologies if my website looks like it's vomiting orange flowers right now... I couldn't narrow down the photos anymore!
If you didn't already know, I also love to paint. Have you checked out my other page, HeyKCho?! I've been watercoloring for years and I taught myself how to hand letter about 3 years ago. I spent about a million hours practicing my ABCs like a crazy person and studying up on techniques and the best painting tools. I never took a class which is sort of crazy... could have made life a lot easier for myself. But I think the fact that I never took a class or learned directly from anymore really helped me develop my own personal style. It's definitely very Springy, lots of color, and will most likely involve a painting of a carrot or some other vegetable.
I have been wanting to try watercolor cookies for the longest time! It just seemed like the greatest hybrid of all the things I love to do: mixing fun colors, eating cookies, painting flowers, lettering encouraging statements, and cutting out thousands of the same shaped thing. I finally made the time to bake and paint them this past weekend and OMGGGGG it was soooooo much fun and relaxing!! I have a bunch of blank cookie canvases sitting in my freezer now just in case I get the creative spark to paint a radish or the next Mona Lisa on a cookie. Should that be my next theme? Italian Renaissance paintings on a cookie??
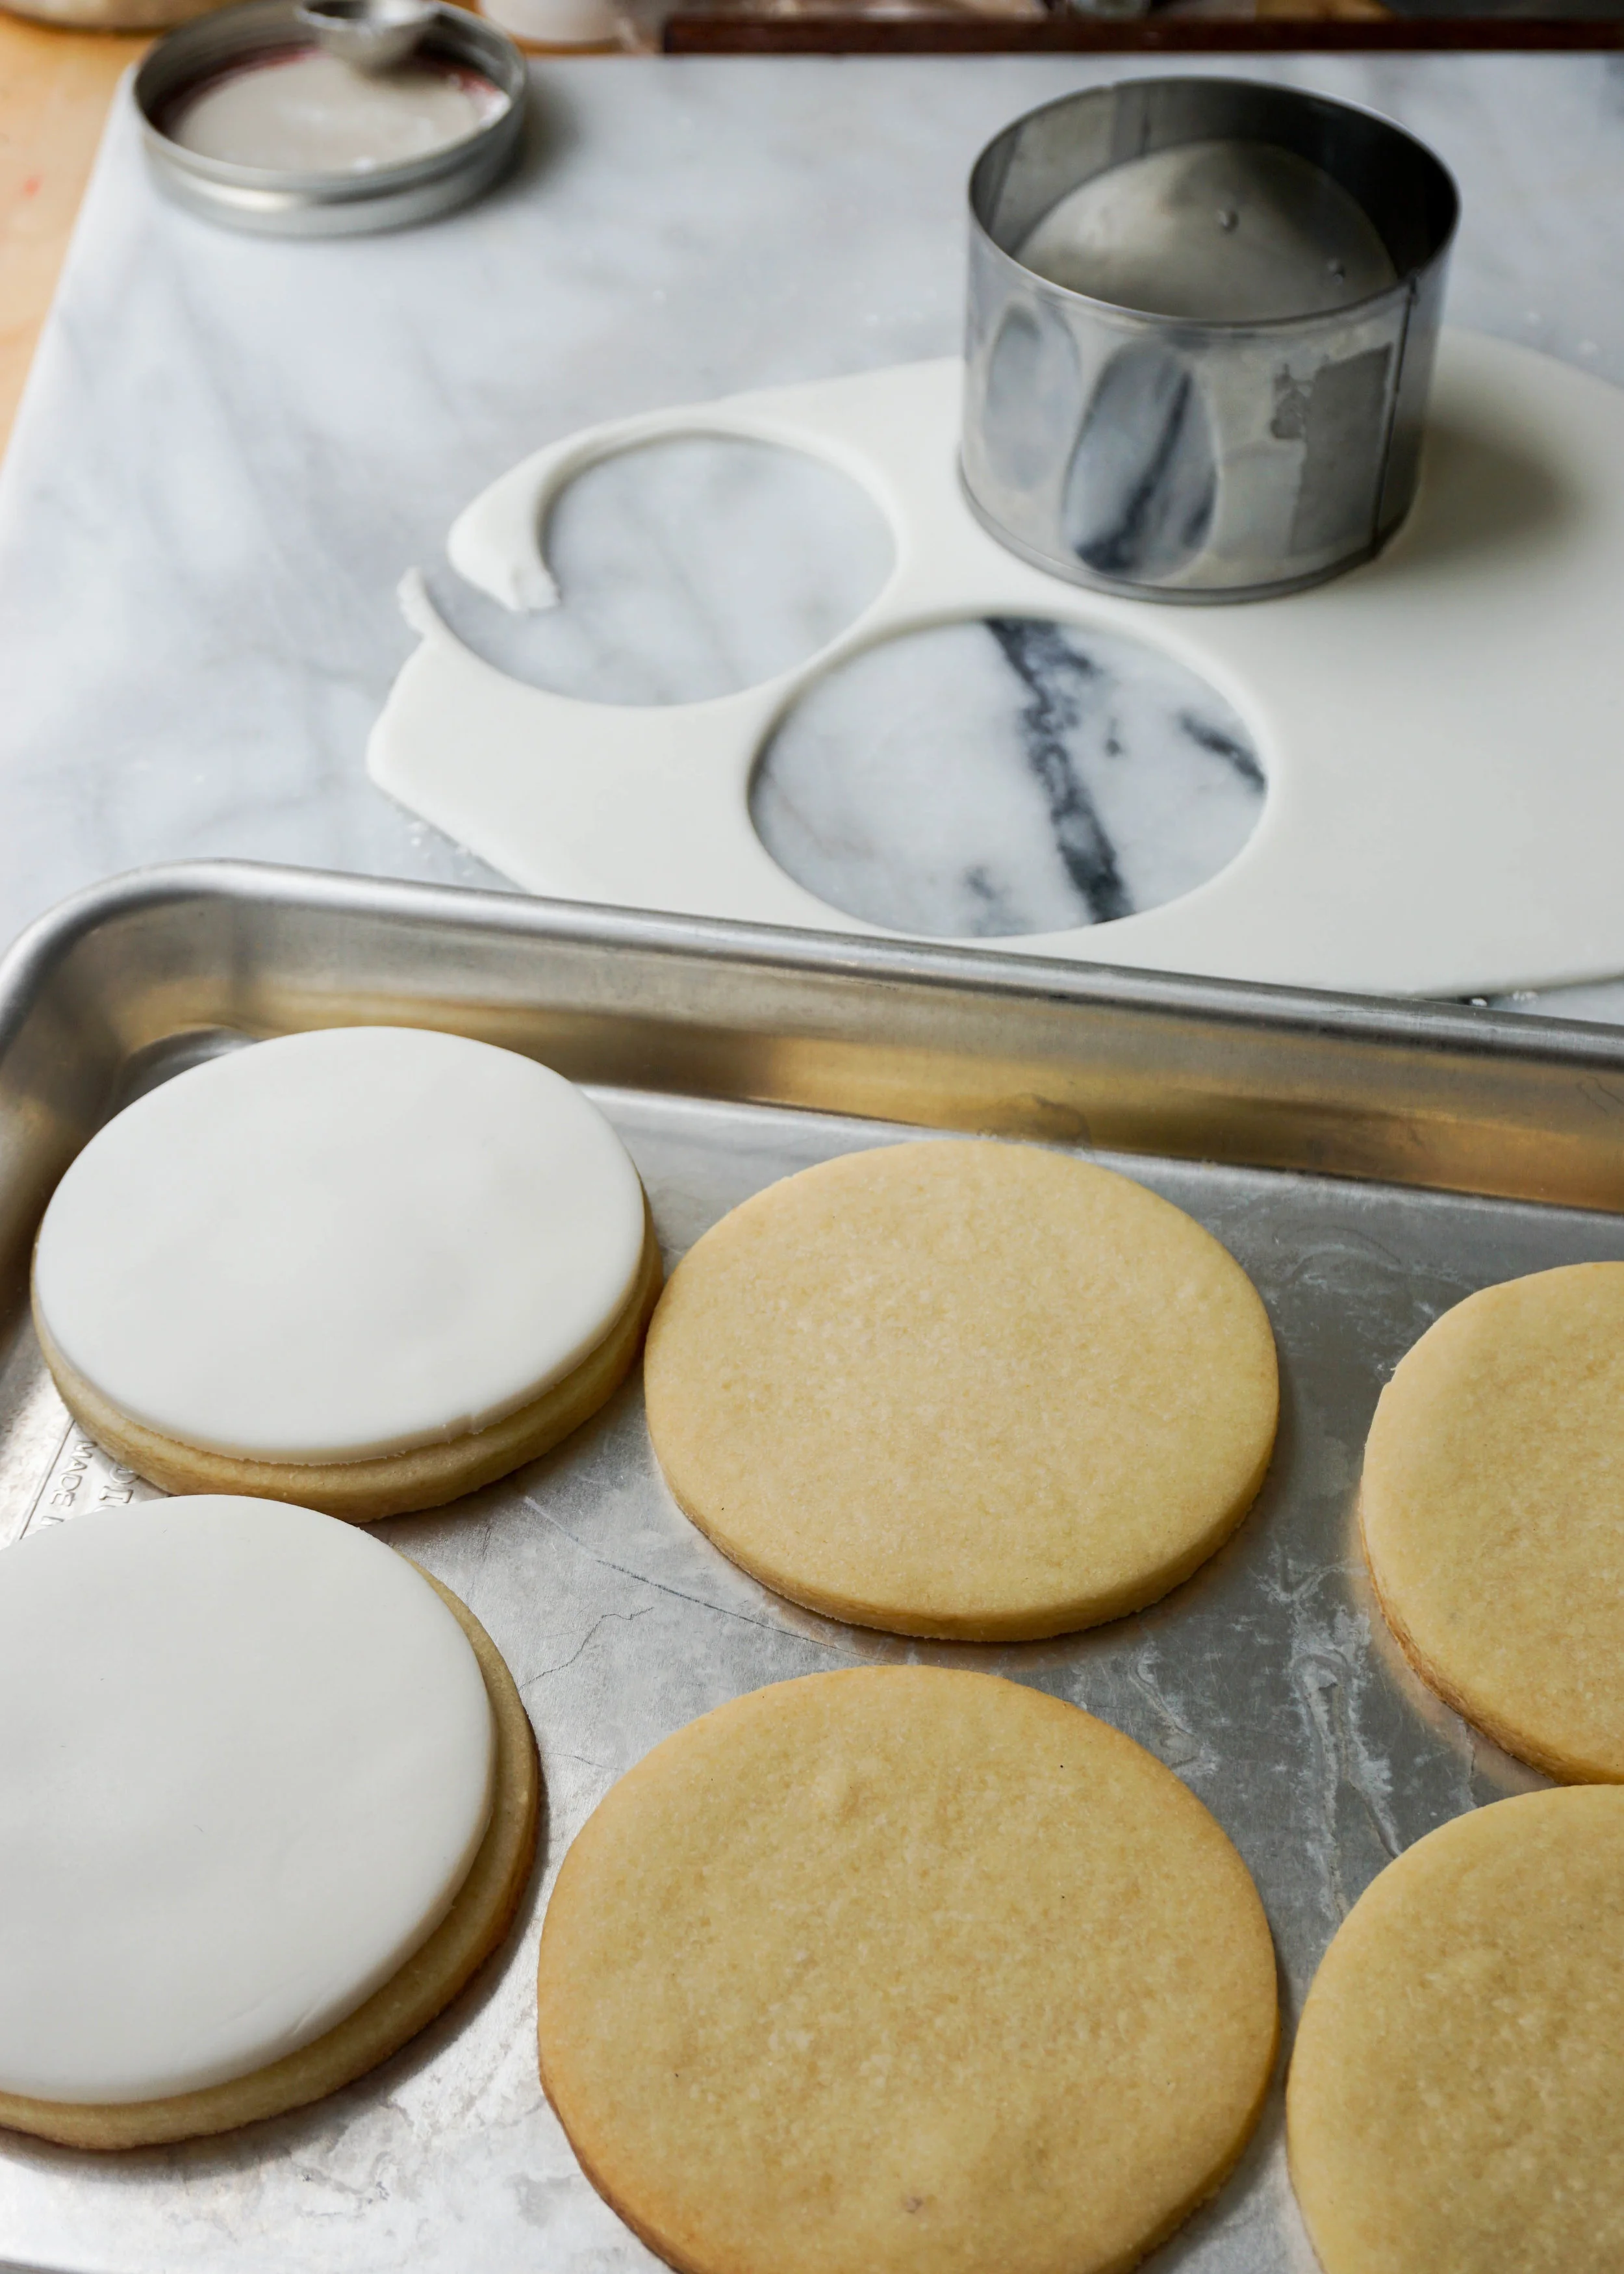
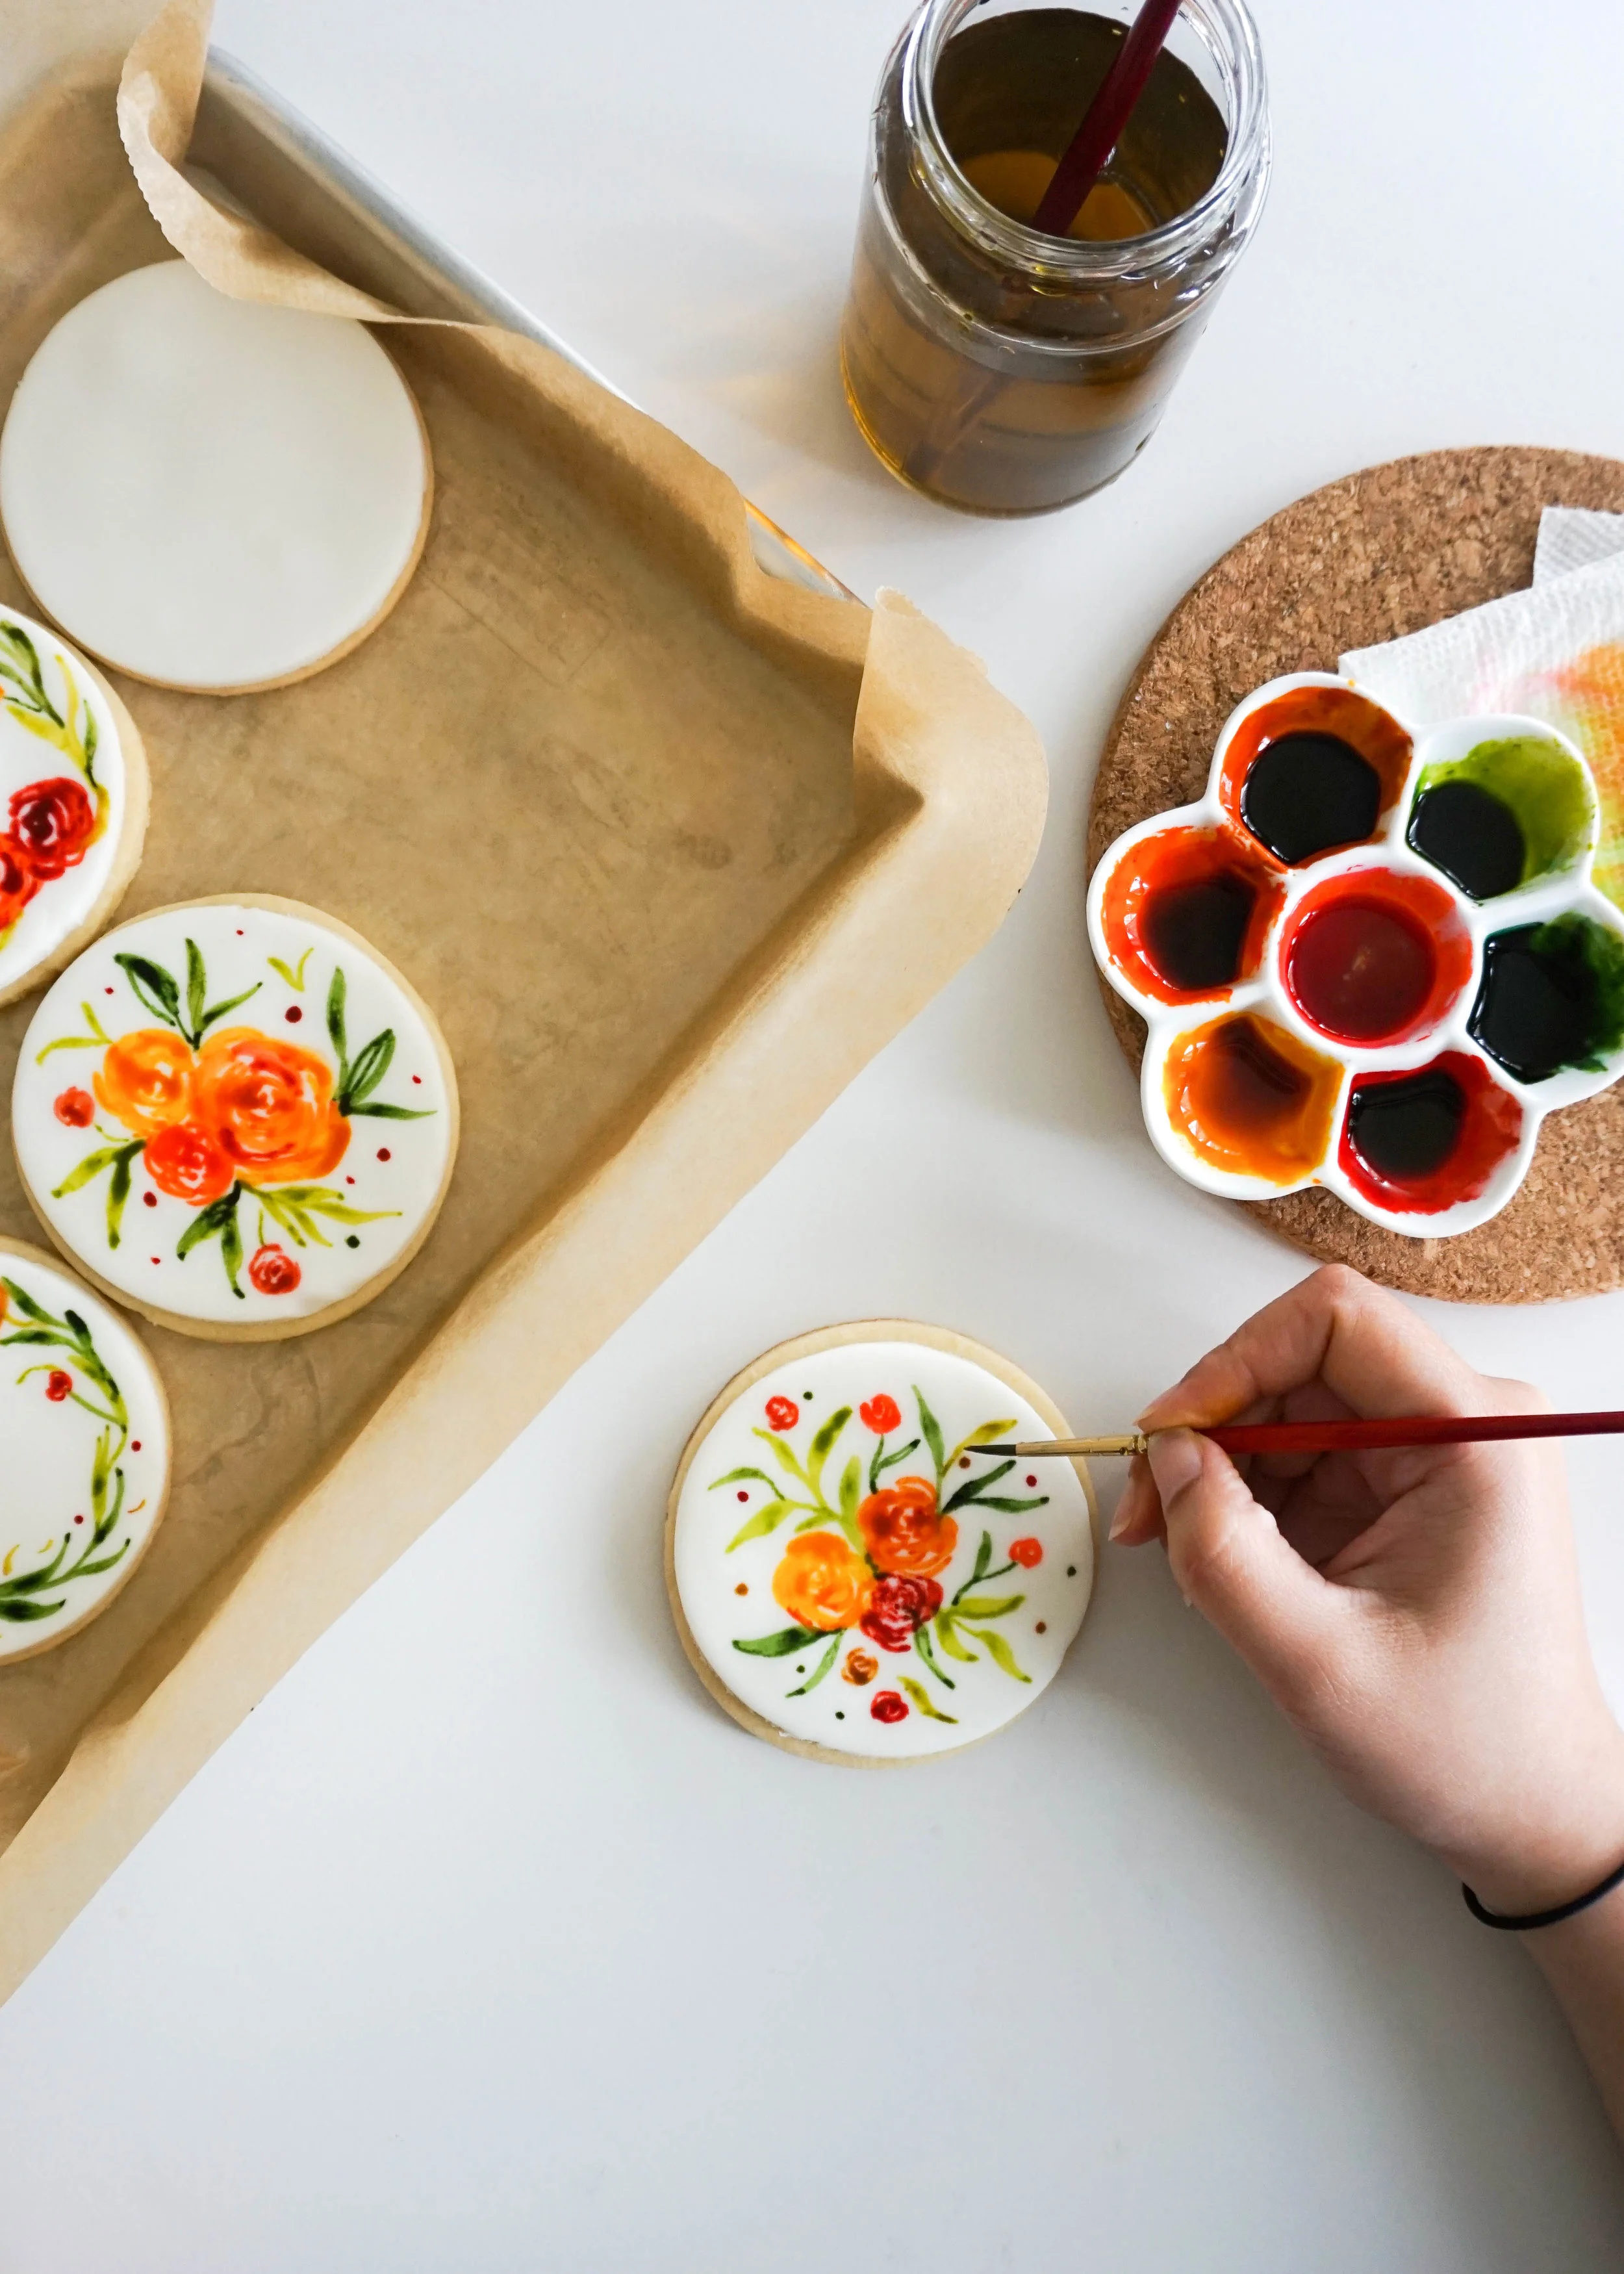
The actual cookie is a really great sugar cookie base. I use a similar dough in my Marbled Tahini Sugar Cookies and Valentine's Day Sugar Cookies. It's sturdy but tender, and if you give the dough enough time to chill in the fridge it holds it's shape incredibly well once baked. Then the cookie is topped with fondant. You could also use royal icing if you don't really enjoy fondant. I'll try royal icing next time. I just got a little nervous that my piping hands were going to get a little shaky. The benefit of using fondant though is that you get really satisfyingly perfect rounds of blank canvas for your cookies. The paints are actually gel food color mixed with a little bit of water. It surprisingly acts a lot like watercolor! You can blend colors and everything!
Someday in the future, when I have more free time and can dedicate more to teaching, I would love to host watercolor classes or even shoot tutorials. But an abundance of time I do not have. I'm going to leave you with a list of tools you'll need to paint these cookies and to also paint on normal paper. I'm also including a few actual painting tips. If there is anything specific you would like to know, please ask away in the comments! Happy Painting and Happy Spring!
Tools:
#3 & #6 Round Brush - These are my favorite brush sizes to use. Round brushes have a fine tip for more delicate line work, but have a fuller base so that when you apply more pressure to the brush you get fuller and broader strokes. If you're painting cookies and also painting on paper, make sure you have different sets of brushes for both uses.
Paint Tray - I have a bunch of these for different palettes. Pretty much a necessity if you want to mix your own colors.
Paint - for cookies you can use any gel food coloring. I use these. But if you are painting on paper, I recommend Reeves or Winston Newton Watercolor Paints.
Canvas - the canvas for these cookies are fondant or you could use royal icing. If you're painting on paper, please only use cold pressed paper. Cold pressed paper has a tooth/texture to the paper which is super important for holding in all the pigments of your watercolors. I only paint on this paper.
Paint Water/Paper Towel - Keep a glass or jar of paint water on the side to clean your brushes and to mix your paints. You'll also need a bundle of paper towels to blot any excess paint from your brush. It's also handy to test out colors you're mixing
Tips:
1. Relax. To be honest painting, especially with watercolor is pretty easy. Watercolor is forgiving and automatically gives you that effortless and abstract look to it.
2. If your painting florals, keep in mind how the actual flower or plant is composed. When painting a flower, think about how the flower petals are tighter towards the center. Like a little bud. Then the petals towards the outside are bigger and more open. That's exactly how you should paint your flower.
3. Mix a few shades of color. If your paintings are looking a little too flat, try mixing extra shades of the colors you're using. In these cookies I mixed 2 shades of green, 3 shades of orange, and 2 shades of red. The differences between them are subtle, but add so much more detail to your work.
4. Paint what you love. Try not to get too hung up on what is trendy. This could be said about cooking too. Don't feel like you have to paint cacti or succulents or even flowers like me! The best paintings you're going to do is by painting things that you love. Which is why I end up painting a lot of vegetables. But maybe your paints are more cat focused? You do you.
Watercolor Sugar Cookies
makes 18 3" cookies
steps:
Whisk together flour, baking powder, and salt in a medium bowl.
In the bowl of your standmixer or with an electric beater, cream together butter and sugar until light and fluffy, about 5 minutes. Add in egg and vanilla extract until combined.
Slowly add in the flour mixture and beat at low speed until dough is evenly mixed. If the dough is a little sandy, knead the dough with your hands for a few minutes.
Divide the dough in half and wrap in plastic wrap. Place in the fridge to chill for at least one hour. Chilling the dough helps the cookies keep their shape.
Preheat your oven to 350 degrees.
Roll out the dough on a lightly floured surface until it is 1/8" to 1/4" thick. Lightly dust the dough with flour if the dough is sticking. Lightly flour your cookie cutter and cut out your cookies.
Arrange cookies on parchment lined baking sheets, about 1" apart from each other. Bake for 15 - 18 minutes for 3" cookies. Bake for less time if your cookies are smaller. Cookies should just be slightly golden.
Allow the cookies to completely cool on a wire rack.
Roll out fondant until thin, less than 1/8" thick. Cut out circles with your cookie cutter. Drizzle a little honey on the cookie as your adhesive. Place circle of fondant on the cookie and gently smooth out the fondant.
In a clean painting dish, add a few drops of your selected gel food coloring. Mix accordingly to get your desired colors. Add a few drops of water and paint whatever you want on the fondant.
Allow the food coloring to dry and enjoy.
materials:
3 cups all purpose flour
1 1/2 tsp baking powder
1/2 tsp salt
2 sticks (16 Tbsp) butter - softened
1 1/2 cup sugar
1 egg
1 tsp vanilla extract
honey
fondant
assortment of gel food coloring